Sign and Verify your Git Commits on GitHub and GitLab with GPG
Git commits should be authentic. It is super easy to do so.
Skip to Setup
GPG and GPG Signing
GPG (GnuPG or Gnu Privacy Guard) is a suite of cryptographic software for ensuring authentic and secure communication between parties. It basically allows sensitive information to be safely shared across an insecure network.
GPG signing verifies that the origin of a message is genuine and has not been altered in any way from what the sender originally sent.
Without GPG signing, you could receive an encrypted email that only you can open, but you would not be able to really prove that it came from the sender.
Why Sign Your Git Commits?
Signing Git commits helps to protect you from attackers who may otherwise inject malicious code into your codebase, as GitHub/GitLab repository administrators can enforce required commit signing on branches to block all commits that are not signed and verified.
It also discourages untrustworthy developers from adding their own back doors to code, because once it's discovered, the bad code can be traced back to them.

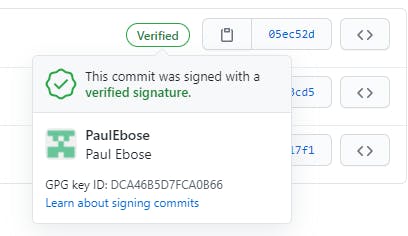
Lastly, it is oddly satisfying to see a verified badge next to a commit.

Setup
Download and install the GPG command line tools for your operating system (most operating systems and Git for Windows comes preinstalled with GPG). Some GPG installations on Linux may require you to use
gpg2.gpg --versionGenerate a new key pair and follow the wizard:
gpg --full-generate-keyYou can leave the defaults but make sure that the:
- keysize is at least
4096 - email address is the same as your GitHub/GitLab email address
- keysize is at least
View the list of GPG keys in your system:
gpg --list-secret-keys --keyid-format LONGFrom the list of GPG keys, copy the
<gpg_key_id>you'd like to use. Here, my GPG key ID is right after "rsa4096/"$ gpg --list-secret-keys --keyid-format LONG /c/users/<username>/.gnupg/pubring.kbx -------------------------------------- sec rsa4096/<gpg_key_id> 2020-12-19 [SC] SF367142B317FD4BA89E7A3853AA5C34371567BD2 uid [ultimate] Paul Ebose (again!) <email@gmail.com> ssb rsa4096/17FD489E7A4A89FR 2020-12-19 [E] sec rsa2048/<gpg_key_id> 2020-12-19 [SC] [expires: 2022-12-19] 77FFC2116F9D8A6C85CC10BE42B317FD4BA89E7A uid [ultimate] Testing <test@mail> ssb rsa2048/3C4940CEB73828EC 2020-12-19 [E] [expires: 2022-12-19]Save your GPG public key to a text file:
gpg --armor --export <gpg_key_id> > path/to/save/gpg-key.txtThe path should be anywhere you can easily access the text file. For example,
Desktop/gpg-key.txtAdd the GPG public key to your GitHub/GitLab account:
- Go to github.com/settings/keys OR gitlab.com/-/profile/gpg_keys
- Click on
New GPG key - Paste in the contents of
gpg-key.txt
You can now delete
gpg-key.txt.Set your GPG signing key in Git:
git config --global user.signingkey <gpg_key_id>

# additional command for users using gpg2
git config --global gpg.program gpg2
Instruct Git to sign your commits:
# per commit
git commit -S -m "your commit message"

# OR per repository
git config --local commit.gpgsign true

# OR under your user account
git config --global commit.gpgsign true  # I do this
Finito! 😎 Next time you make a git commit, GPG will ask for your passphrase to sign the commit.
More Information
To edit details associated with a <gpg_key_id>, run:
# list available keys
gpg --list-secret-keys --keyid-format LONG

# edit a single key
gpg --edit-key <gpg_key_id>
To disable GPG signing in a single commit, run:
git commit --no-gpg-sign -m "your commit message"
To disable GPG signing in a repository, run:
git config --local commit.gpgsign false

# or just remove the GPG settings from git config
git config --local -e
git config --global -e
You may receive an error like this when trying to make a commit:
error: gpg failed to sign the data
fatal: failed to write commit object
To resolve the error, add the following to your zsh or bash config file:
# Enable gpg-agent if it is not running-
# --use-standard-socket will work from version 2 upwards

AGENT_SOCK=$(gpgconf --list-dirs | grep agent-socket | cut -d : -f 2)

if [[ ! -S $AGENT_SOCK ]]; then
  gpg-agent --daemon --use-standard-socket &>/dev/null
fi
export GPG_TTY=$TTY

# Set SSH to use gpg-agent if it's enabled
GNUPGCONFIG="${GNUPGHOME:-"$HOME/.gnupg"}/gpg-agent.conf"
if [[ -r $GNUPGCONFIG ]] && command grep -q enable-ssh-support "$GNUPGCONFIG"; then
  export SSH_AUTH_SOCK="$AGENT_SOCK.ssh"
  unset SSH_AGENT_PID
fi
Script from github.com/ohmyzsh/ohmyzsh/blob/master/plug..
If you're using fish, add this to config.fish:
set -gx GPG_TTY (tty)
More Protection
Having a really strong passphrase should be enough protection. But you may want to use the GPG private keys across multiple devices or just want it extracted away from your PC. You can use a dedicated cloud service, hardware token (the safer alternative), or some other form of storage. This github repo is a great guide to set up YubiKey, a popular option for using hardware tokens. For securely storing GPG keys online, Keybase is a good choice. You can suggest other options in the comments.
If you want to stay here for a while, spot where the GIF ends.
